These are general instructions to install the TLIMS Test System onto your workstation
Do I need admin rights?
No. This test system installation is designed to allow you to install to a folder that is not governed by administrator rights. The installation routine is a simple copy and extract function that places the current file set to enable you to run.
Basic Steps for Installation
Download the Current Test System
You’ll need to download the current installation zip/archive file from the Current Downloads page.
Extract the Zip/Archive file to a source directory
Once you fully downloaded the source archive, you’re going to need to extract it to a location that can get to. We always recommend creating a source folder, copying/moving the archive file over to this file and then extract the contents.
If you’re unfamiliar with how to extract files, this is an excellent article to reference: 4 Ways to Extract Zip Files
Here is a sample of extracting the files within the Downloads folder (which is the default for downloading things from the Internet)

Run the Installer Executable
Double-click/Run the File: TLIMS Test System Installer.exe this is the installer program which will analyze your setup and see if you even need to update.

Installer Properties
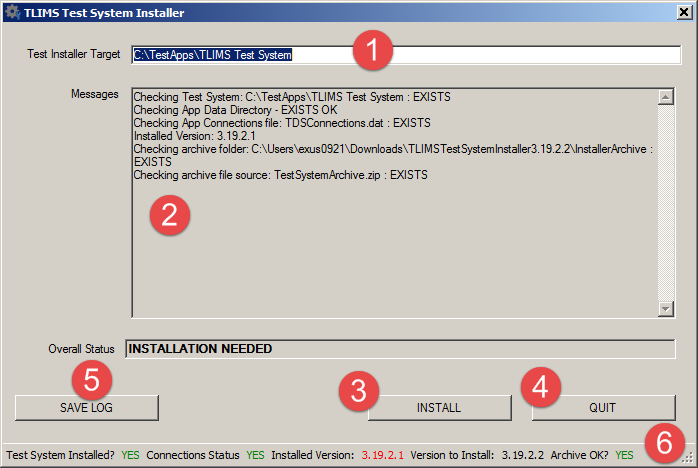
The TLIMS Test Installer is a custom-designed installer program that helps you make a working version of the Test System. The main Installer screen is broken down into sections:
- Test Installer Target – this edit box allows you to change the target destination of the Test System. If you have a C: drive, it’s best to just leave this alone and let it use the root of C to create a \TestApps folder and then a subsequent TLIMS Test System folder. This is where all the files are going to go.
The best part of this is you don’t need admin rights to create and update this folder. If you choose a different location, you might need those. Also it’s good to understand that this should be on a local hard drive and not on a network share. There are quite a number of files and the installation (when fully extracted) is in the range of 250MB+. - Status Log – the Status Log is going to contain all the messages that the installer spits out. You don’t have to pay too much attention unless there is a problem! If there is you can use the Save Log (#5) button to save the output to a file and send it to us so we can see what’s going on.
- Install Button – Click this button to actually start the installation. It will prompt for a warning just in case you hit it by mistake but this will kick off the installation process.
- Quite Button – Click this to quit the installer.
- Save Log Button – we mentioned this above but this button allows you to save the contents of the Status Log to a text file that you can email us in the event there is a problem.
- Status Bar – the Status Bar contains little pieces of information that are important to the installer:
- Test System Installed? Indicates (YES/NO) if the installer detects an installation of the Test System on the target folder.
- Connections Status – Indicates if there is a connection data file setup to allow the Test System to connect to the QA Test Server properly.
- Installed Version – Gives you the current version of the Test System installed and will be in a RED font if it conflicts with the current version you are trying to install.
- Version to Install – This will display the target version of the installer.
- Archive OK? This will indicate YES/NO if the actual archive file that contains the zipped test system files. This is not to be confused with the archive/zip file you downloaded from the web site (this archive is within that installer archive). If this indicator shows NO (in RED), you will NOT be able to install.
Start the Installer
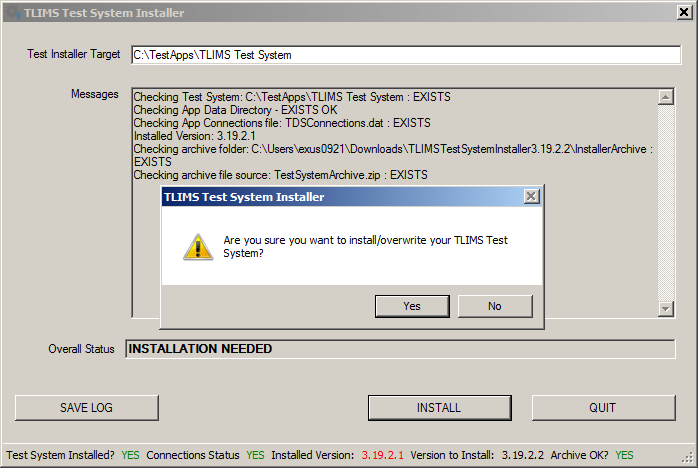
Click the INSTALL button and confirm that you want to install:

As the installer runs, you will see the hourglass/waiting cursor. The extraction and copying of the files can take some time depending on your workstation. If any errors are encountered, please take a screenshot and report any issues to TLIMSSupport@trinitydatasolutions.com.
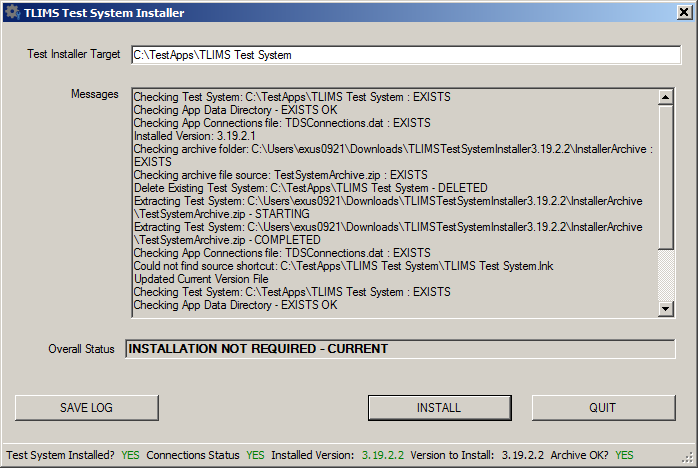
When the installer is complete, the screen will look something like:

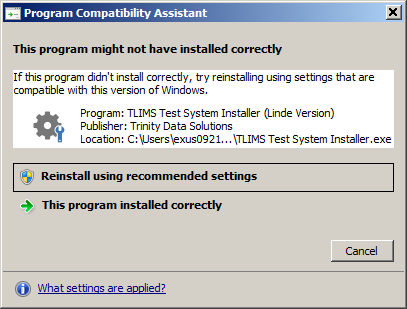
When you hit quit, we’ve noticed on some Windows 7 installations that the detection of an application installation occurred. If you should see the following screen:

Click the This program installed correctly (because it did!)
